Processing Images in Lightroom 3, Part 23

Home » Processing Images in Lightroom 3, Part 23

Processing Images in Lightroom 3, Part 23

Posted in

Continuing now from Part 22 of the series!

I’ve got my 699 images taken on Feb. 3 imported onto my hard disk and into my Ridgefield NWR LR3 catalog.  (LR3 catalogs have a .lrcat extension on the catalog filename).  The next step in processing can be one of the most time consuming parts–and that is screening out unwanted or just plain bad images, so I don’t have to deal with them.

Weeding Out the Duds

A dud is an image that just can’t be made into a picture that I would want to show anyone.  If you just started in the hobby of photographing birds, there is a good chance you will tend to save almost every shot you take and maybe even display these shots for the world to see.  I can look back at my early 2007 files and see images I have saved for all these years, that by the self-imposed standards that I use today, wouldn’t make it past the first pass in my screening process.  So when I say beginning shooters tend to save most everything–I’m going by my own experience.

I mentioned back in one of the earlier articles of this series that I recommended beginners shoot everything they see regardless of lighting, background, etc., not because the shots will turn out to be all that great but for the practice the photographer is getting developing technique, and observing what the images look like under different conditions.  The idea is to learn what makes a poor image and what makes a good image (obviously subjective but there are generally accepted characteristics that most bird photographers agree make a ‘good’ photo), and what needs to be changed to begin moving toward more ‘good’ images.  If you missed it, please see my list in Part 11 under Qualities of a Good Bird Photo.

As you move from a beginner to an intermediate bird photographer, your standards of what is acceptable to keep and display publicly will hopefully go up.  So it’s safe to say that generally, the more skills and experience a bird photographer has acquired, the ‘pickier’ the photographer is about which images are kept and worth the time of further processing.

One other thought related to this–another pitfall I was guilty of as a beginner was that I would post almost any shot I took, on the Internet forums and galleries for people to see.  It took me about a year and a half to realize what I was doing to my reputation as a photographer.  By posting quantity–not quality–I was just another newbie posting anything and everything just because it might have been close to being in focus, with no regard for composition, background, lighting, pose, etc.  Take it from me, it was tough to admit to myself that so many of the shots I was posting were really just so-so shots and nothing to get excited about.  I was getting a so-so reputation and there was an obvious huge gap in quality between my posted work and the work of some really talented photographers.  “Why are these other shooters getting so many great comments on their shots?” I would ask myself.  Well, it’s because they don’t post their crap shots!  They exercise a little pride and restraint and display only the best they have.

I was given good advice by a few pros to always post my best work.  Don’t be tempted to post shots that are truthfully just ho-hum shots.  For the most part I have been trying to follow this advice.  If there’s a shadow running across the eye of the bird but everything else about the shot is really awesome, maybe keep a pose or two for your archives but don’t put it out there with that flaw for the world to see.  It’s better to post one great shot per month than a hundred so-so shots.  That one great shot will stick in the mind of viewers a lot longer than those hundred ho-hum shots.

Okay, back to weeding out the duds!  The first thing I do with a batch of newly imported images is to look at each one at 100% crop and check for focus, obvious uncorrectable exposure issues, poses that are unacceptable, like when I can’t see the bird’s eye, etc.  (The non-focus issues don’t have to be looked at with a 100% crop though).  I’ve taken and processed so many shots now that I can usually tell at a 100% crop, what focus level will pass muster and might possibly be usable.  If a shot does not meet my pre-determined focus standard, I hit the ‘X’ key and the file gets marked as rejected by LR3.  It matters not if everything else about the shot is outstanding.  If it isn’t in focus, the shot can’t be used or seen by anyone.  Remember, some bird shots are considered in focus if the eye, bill and general head feathers are sharp.  Sometimes DOF will take the rest of the bird or parts of the bird out of focus.  I have to decide whether, overall, the shot is worthy and that it will add positively to my reputation and not take the quality level of my portfolio down a notch.

Quite often when I’m out shooting, a bird will let me take its picture for several minutes or even longer.  If it looks like the shot has good potential to turn out well, I’ll take a lot of frames of the bird to get a good variety of poses and also to make sure I have some sharp shots to choose from.  It’s not uncommon for me to take 100-200 frames of a single bird when the opportunity presents itself.  But when I get back home and import the shots into LR3, this is where I pay for the opportunity I was afforded out in the field!

I now have to individually view each shot of this 200 frame series I just took.  One way to do this is to use LR3’s Compare View feature in the Library module.  There’s an icon in the Library view under the image that has an X and Y next to each other.  When I select this icon, two image boxes open up, one labeled “Select” and the other “Candidate.”  The idea here is to select a reasonably good image for the “Select” image box, then use either of the two arrow icons to select another image to compare it to.  In both of these image panes I can be zoomed in to 100% to get a good look at the focus level of both images.  If my Select image is still sharper than the Candidate, I hit the arrow icon again and go to the next comparison photo.  If one of the comparison images turns out to be sharper than my Select image, then I click the “Make Select” icon which moves the sharper image over into the Select image box.  I continue to click the arrows until all images have been compared.  At any point in the comparison process, I can mark any image as a “Pick” by pressing the P key when I have the image highlighted.

Now that I’ve gone through these 200 frames of this one bird, let’s say I have widdled the batch down to 20 sharp photos.  Assuming the light, background, perch, etc., are all similar in each image, I’m mainly concerned now with which one shot is both very sharp (there still could be some of the 20 sharper than others) and one that has the most interesting pose.  I’ll usually go through them again maybe not even zoomed very much, if at all, to check for the best pose.  Now I widdle the 20 down to say, three with good poses.  I go back to 100% zoom and check those three for the best sharpness, and will typically go with the one that is sharpest.  But if all three are sufficiently sharp, I’ll let the poses decide which image I will process further, hopefully for public display.

Taking some images through the process

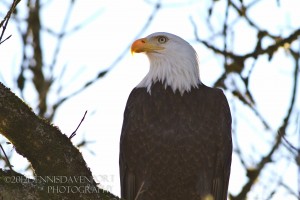
On my Feb. 3, shoot at Ridgefield, there were several encounters with birds where I had time to take a lot of frames.  One of these encounters is where I came across a mature Bald Eagle only 15 to 20 feet from me perched on a branch about 15 feet high.  There were no obstructions in front of the bird except a few small branches within about 2 inches of the talons.  Regardless of whether I was shooting portrait or landscape orientation, the whole bird would not fit in the frame because I was so close.  On top of that, I have the sun almost directly behind the bird (bright white sky)!  (Recall from earlier parts of this series that I am shooting from my truck).  The front of the eagle is facing me and is in shade, while the sun is on the bird’s back.

I opted to leave my flash turned off and go with straight ambient light.  Due to my close proximity to the bird I stopped the lens down to f6.3 just to gain a little DOF.  I set ISO at 640 and my shutter speed at 1/640.  I take a quick test shot and glance at the LCD for any blinkies–very little if any, so I continue shooting bursts of 3 to 6 shots, refocusing with the center focus point on the eye, shooting more bursts, etc.  Luckily, my truck was parked at an angle where I could shoot with my lens propped up against the window frame, which helped brace the camera.  I ended up with about 70 shots of the bird before it decided to take flight.  An opportunity like this doesn’t present itself very often in the wild so I was really excited.

With the sun behind the bird, I knew these could be killer shots or, they could all be destined for the recycle bin.  Happily, I ended up with quite a few in focus and several poses to choose from.  What I would like to do is to take you through my workflow with a few of these shots in as much detail as possible.   I’ll surely lose some of you to boredom but hopefully a few of you will hang in there and ‘observe’ how one other hobbyist bird photographer (me) goes about post-processing images.  But I want to talk a little about Develop Settings since chronologically, they are executed during the first stage of processing, and that is import.

Develop Settings

Back a few pages I talked about importing my RAW images with Develop Settings selected on the import screen so that whatever adjustments I had saved in my Develop Settings preset would automatically be applied to all 699 images imported from my Compact Flash card.  Here, I want to disclose what those adjustments are so that you’ll have a reference point to start with when you process your own images in LR3.

My Develop Presets for LR3:

White balance I leave at “As shot.”  That takes care of Temp and Tint.

Exposure:  0

Recovery :  0

Fill light:   0

Blacks:  +5

Brightness: +50

Contrast: +25

Clarity:  +50

Vibrance:  +31

Saturation: +2

All other settings in my Dennis presets are the defaults that LR3 assigns.  In fact, many of these above are LR3 defaults.  I think my main changes were the last 3 items, Clarity, Vibrance, and Saturation.

[Edit 11Mar2012: If you’re running LR4, which was just released, these are my LR4 Develop Presets that I apply to every image in LR4:

Exposure & Contrast: 0

Highlights: -27

Shadows: -15

Whites: 0

Blacks: -12

Clarity: +32

Vibrance: +31

Saturation: +2

End of Develop Settings.


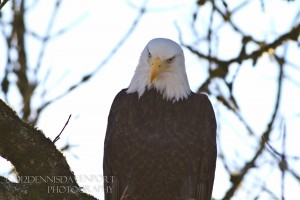
Here are three RAW images just after import into LR3.  They’ve had a minimal amount of adjustment at this point and they need a lot of help.  Click on these images to see larger views.


The thing going for me with these 3 shots is that they are decent poses, the bird fills up the frame, and they were in pretty good focus.  The bad things about them are the bright white sky in the background, the distracting out of focus branches surrounding the bird, the images are still flat even after getting a dose of my ‘Dennis’ Develop preset at import.  Also, in the vertical shot, there’s a branch on the lower right of the photo that sticks out in front of the bird and is quite distracting.

Screen calibration

Before I go any further I want to talk a little about calibrating your monitor screen.  It’s almost pointless to go into a photo editing program and perform all sorts of adjustments on an image if your monitor is displaying your image too brightly, or with too much color saturation, etc.  The image itself may be perfectly fine but your monitor may be configured incorrectly.  If this is the case, then the adjustments you make to your image will likely be incorrect and make the image even worse.  It’s important that you see the image the way it is supposed to look.

Calibration software and devices are available but are not real cheap.  I use an X-rite Eye One calibrator which makes calibration fairly painless.  If you can’t afford something like this, then manually calibrating your screen is better than nothing. Windows 7 has a Display Color Calibration program in the Display section of the Control Panel.  Running through this process every few months will help keep your monitor displaying your images the way they should be displayed.

Lightroom 3’s Process Version

In Lightroom 3, Adobe improved the adjustment controls so much (especially sharpening and noise reduction), that they had to include a “2010 Process Version” and also include the previous “2003 Process Version,” so owner’s of Lightroom versions 1 & 2 could choose to display their images with either version.

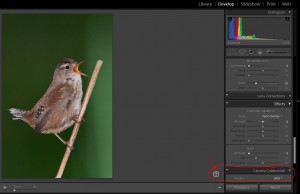
I have thousands of RAW images in my catalog that were processed with LR2 or LR1, which both used the initial 2003 process version.  If I select one of those images in LR3, a small exclamation point icon shows up in the bottom right corner of the main image viewing area.  The image below shows the icon circled in red.  Just to the right of this icon it confirms that the image being displayed was processed with the 2003 version.  The image doesn’t look all that great either—lots of noise and needs sharpening.

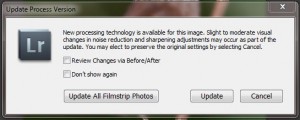
If I click the exclamation point I get this box.


I can choose to update just this image or all the images in the filmstrip.  I can also choose to view each image before and after the change to the 2010 version.  In this case, since I’m not taking time to re-process these 2009 images right now, I’ll choose to update just this wren photo to the 2010 process version.  I now have all the adjustment sliders in LR3 available to work with on this image.

Lightroom 4 will also have a new process version, 2012, to go along with the 2003 and 2010 versions.

Pick a shot to process

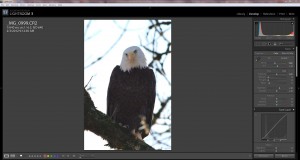
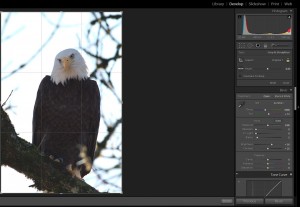
Now, it’s time to choose a shot to work on and get down to the nitty gritty of image processing.  I’m going to start with the vertical image.  I’ve got it selected in LR3 and I’m in Develop mode.  The only panel I have left open is the one on the right where my adjustment controls are.  The other three are hidden and out of the way so the image will display larger.  Here’s the screen print.

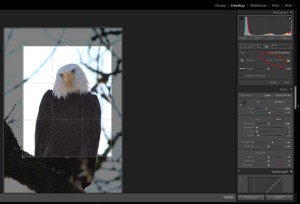
I’ll generally adjust the controls from the top down. I usually do my cropping first so I click the rectangle icon on the left of the Tool Strip to open the crop tool.  The screen shot below is showing the grid on the image and by clicking the crop icon, the panel underneath the Tool Strip now has changed to crop-related adjustment tools.  The large image is also framed now with a grid and handles with which to adjust the crop size.  At this point, if I needed to straighten the image, which I don’t, I would click just outside the image border (on the gray) and the cursor would turn to a double-arrow icon bent at 90 degrees.  I then would just drag the mouse a little to get the image turned straight.  LR3 would then automatically crop the crooked edges off and straighten the image.


I decide now to use a 4×5 crop on this image and I do this by selecting the 4×5 aspect ratio from a list of ratios that I use a lot.  If you look back up at the previous screen print, the word “Original” appears across from the Aspect tool.  This is my default, but if I click on the word “Original,” a drop-down menu gives me more choices for size of crop, and I picked 4×5.

You can see in the screen shot below that I have cropped out a lot of stuff around the bird—even the perch, which I wasn’t too excited about anyway.  But I also cropped out that distracting branch in the lower-right corner.  I lost some good stuff like the talons but the branch could have been a problem to deal with—although not impossible to remove.  I just chose the easier road here.


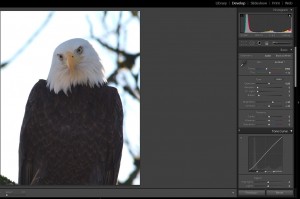
Once I have the crop frame where I want it on the image, I click the crop icon (rectangle) again, and the image is cropped and the crop tool closes.  The next screen shot displays the image cropped and ready to move on to the next adjustments.

Lately, I’ve been having technical difficulties with WordPress, the software I use to run my site theme.  I am going to have to break up this article into two parts to get around this problem.  So I’ll stop here and continue where I left off in the next article, Part 24.  Please be sure to read ahead to the next part (24) for my continuation of how I use Lightroom 3 in post-processing!

<<Previous Article                                                                                     Next Article >>

Bird Photography Equipment (1)

DSLR Features for Bird Photography (2)


Memory Cards for Cameras (3)

Lenses for Bird Photography (4)

Bird Photography Accessories (5)

Tripod or Monopod? (6)

More Accessories for Bird Photography (7)

Software Introduction for Bird Photography (8)

Introduction to Capturing Bird Images (9)

JPG or RAW? (10)

Shooting Bird Photos (11)

Camera Exposure Modes (12)

Other Camera Settings and Features (13)

Exif Data (14)

Depth of Field and Aperture (15)

Best Time to Photograph Birds (16)

Composition in Bird Photography (17)

Getting Close in Bird Photography (18)

Backgrounds in Bird Photography (19)

Using External Flash in Bird Photography (20)

Photographing Birds in Flight, 21

Lightroom 3 – The Hub of My Workflow (22)

Processing Images in Lightroom 3 (24)
From Lightroom to Plugins (25)

Using Lightroom to Upload Images (26)

Posted in

Continuing now from Part 22 of the series!

I’ve got my 699 images taken on Feb. 3 imported onto my hard disk and into my Ridgefield NWR LR3 catalog.  (LR3 catalogs have a .lrcat extension on the catalog filename).  The next step in processing can be one of the most time consuming parts–and that is screening out unwanted or just plain bad images, so I don’t have to deal with them.

Weeding Out the Duds

A dud is an image that just can’t be made into a picture that I would want to show anyone.  If you just started in the hobby of photographing birds, there is a good chance you will tend to save almost every shot you take and maybe even display these shots for the world to see.  I can look back at my early 2007 files and see images I have saved for all these years, that by the self-imposed standards that I use today, wouldn’t make it past the first pass in my screening process.  So when I say beginning shooters tend to save most everything–I’m going by my own experience.

I mentioned back in one of the earlier articles of this series that I recommended beginners shoot everything they see regardless of lighting, background, etc., not because the shots will turn out to be all that great but for the practice the photographer is getting developing technique, and observing what the images look like under different conditions.  The idea is to learn what makes a poor image and what makes a good image (obviously subjective but there are generally accepted characteristics that most bird photographers agree make a ‘good’ photo), and what needs to be changed to begin moving toward more ‘good’ images.  If you missed it, please see my list in Part 11 under Qualities of a Good Bird Photo.

As you move from a beginner to an intermediate bird photographer, your standards of what is acceptable to keep and display publicly will hopefully go up.  So it’s safe to say that generally, the more skills and experience a bird photographer has acquired, the ‘pickier’ the photographer is about which images are kept and worth the time of further processing.

One other thought related to this–another pitfall I was guilty of as a beginner was that I would post almost any shot I took, on the Internet forums and galleries for people to see.  It took me about a year and a half to realize what I was doing to my reputation as a photographer.  By posting quantity–not quality–I was just another newbie posting anything and everything just because it might have been close to being in focus, with no regard for composition, background, lighting, pose, etc.  Take it from me, it was tough to admit to myself that so many of the shots I was posting were really just so-so shots and nothing to get excited about.  I was getting a so-so reputation and there was an obvious huge gap in quality between my posted work and the work of some really talented photographers.  “Why are these other shooters getting so many great comments on their shots?” I would ask myself.  Well, it’s because they don’t post their crap shots!  They exercise a little pride and restraint and display only the best they have.

I was given good advice by a few pros to always post my best work.  Don’t be tempted to post shots that are truthfully just ho-hum shots.  For the most part I have been trying to follow this advice.  If there’s a shadow running across the eye of the bird but everything else about the shot is really awesome, maybe keep a pose or two for your archives but don’t put it out there with that flaw for the world to see.  It’s better to post one great shot per month than a hundred so-so shots.  That one great shot will stick in the mind of viewers a lot longer than those hundred ho-hum shots.

Okay, back to weeding out the duds!  The first thing I do with a batch of newly imported images is to look at each one at 100% crop and check for focus, obvious uncorrectable exposure issues, poses that are unacceptable, like when I can’t see the bird’s eye, etc.  (The non-focus issues don’t have to be looked at with a 100% crop though).  I’ve taken and processed so many shots now that I can usually tell at a 100% crop, what focus level will pass muster and might possibly be usable.  If a shot does not meet my pre-determined focus standard, I hit the ‘X’ key and the file gets marked as rejected by LR3.  It matters not if everything else about the shot is outstanding.  If it isn’t in focus, the shot can’t be used or seen by anyone.  Remember, some bird shots are considered in focus if the eye, bill and general head feathers are sharp.  Sometimes DOF will take the rest of the bird or parts of the bird out of focus.  I have to decide whether, overall, the shot is worthy and that it will add positively to my reputation and not take the quality level of my portfolio down a notch.

Quite often when I’m out shooting, a bird will let me take its picture for several minutes or even longer.  If it looks like the shot has good potential to turn out well, I’ll take a lot of frames of the bird to get a good variety of poses and also to make sure I have some sharp shots to choose from.  It’s not uncommon for me to take 100-200 frames of a single bird when the opportunity presents itself.  But when I get back home and import the shots into LR3, this is where I pay for the opportunity I was afforded out in the field!

I now have to individually view each shot of this 200 frame series I just took.  One way to do this is to use LR3’s Compare View feature in the Library module.  There’s an icon in the Library view under the image that has an X and Y next to each other.  When I select this icon, two image boxes open up, one labeled “Select” and the other “Candidate.”  The idea here is to select a reasonably good image for the “Select” image box, then use either of the two arrow icons to select another image to compare it to.  In both of these image panes I can be zoomed in to 100% to get a good look at the focus level of both images.  If my Select image is still sharper than the Candidate, I hit the arrow icon again and go to the next comparison photo.  If one of the comparison images turns out to be sharper than my Select image, then I click the “Make Select” icon which moves the sharper image over into the Select image box.  I continue to click the arrows until all images have been compared.  At any point in the comparison process, I can mark any image as a “Pick” by pressing the P key when I have the image highlighted.

Now that I’ve gone through these 200 frames of this one bird, let’s say I have widdled the batch down to 20 sharp photos.  Assuming the light, background, perch, etc., are all similar in each image, I’m mainly concerned now with which one shot is both very sharp (there still could be some of the 20 sharper than others) and one that has the most interesting pose.  I’ll usually go through them again maybe not even zoomed very much, if at all, to check for the best pose.  Now I widdle the 20 down to say, three with good poses.  I go back to 100% zoom and check those three for the best sharpness, and will typically go with the one that is sharpest.  But if all three are sufficiently sharp, I’ll let the poses decide which image I will process further, hopefully for public display.

Taking some images through the process

On my Feb. 3, shoot at Ridgefield, there were several encounters with birds where I had time to take a lot of frames.  One of these encounters is where I came across a mature Bald Eagle only 15 to 20 feet from me perched on a branch about 15 feet high.  There were no obstructions in front of the bird except a few small branches within about 2 inches of the talons.  Regardless of whether I was shooting portrait or landscape orientation, the whole bird would not fit in the frame because I was so close.  On top of that, I have the sun almost directly behind the bird (bright white sky)!  (Recall from earlier parts of this series that I am shooting from my truck).  The front of the eagle is facing me and is in shade, while the sun is on the bird’s back.

I opted to leave my flash turned off and go with straight ambient light.  Due to my close proximity to the bird I stopped the lens down to f6.3 just to gain a little DOF.  I set ISO at 640 and my shutter speed at 1/640.  I take a quick test shot and glance at the LCD for any blinkies–very little if any, so I continue shooting bursts of 3 to 6 shots, refocusing with the center focus point on the eye, shooting more bursts, etc.  Luckily, my truck was parked at an angle where I could shoot with my lens propped up against the window frame, which helped brace the camera.  I ended up with about 70 shots of the bird before it decided to take flight.  An opportunity like this doesn’t present itself very often in the wild so I was really excited.

With the sun behind the bird, I knew these could be killer shots or, they could all be destined for the recycle bin.  Happily, I ended up with quite a few in focus and several poses to choose from.  What I would like to do is to take you through my workflow with a few of these shots in as much detail as possible.   I’ll surely lose some of you to boredom but hopefully a few of you will hang in there and ‘observe’ how one other hobbyist bird photographer (me) goes about post-processing images.  But I want to talk a little about Develop Settings since chronologically, they are executed during the first stage of processing, and that is import.

Develop Settings

Back a few pages I talked about importing my RAW images with Develop Settings selected on the import screen so that whatever adjustments I had saved in my Develop Settings preset would automatically be applied to all 699 images imported from my Compact Flash card.  Here, I want to disclose what those adjustments are so that you’ll have a reference point to start with when you process your own images in LR3.

My Develop Presets for LR3:

White balance I leave at “As shot.”  That takes care of Temp and Tint.

Exposure:  0

Recovery :  0

Fill light:   0

Blacks:  +5

Brightness: +50

Contrast: +25

Clarity:  +50

Vibrance:  +31

Saturation: +2

All other settings in my Dennis presets are the defaults that LR3 assigns.  In fact, many of these above are LR3 defaults.  I think my main changes were the last 3 items, Clarity, Vibrance, and Saturation.

[Edit 11Mar2012: If you’re running LR4, which was just released, these are my LR4 Develop Presets that I apply to every image in LR4:

Exposure & Contrast: 0

Highlights: -27

Shadows: -15

Whites: 0

Blacks: -12

Clarity: +32

Vibrance: +31

Saturation: +2

End of Develop Settings.


Here are three RAW images just after import into LR3.  They’ve had a minimal amount of adjustment at this point and they need a lot of help.  Click on these images to see larger views.


The thing going for me with these 3 shots is that they are decent poses, the bird fills up the frame, and they were in pretty good focus.  The bad things about them are the bright white sky in the background, the distracting out of focus branches surrounding the bird, the images are still flat even after getting a dose of my ‘Dennis’ Develop preset at import.  Also, in the vertical shot, there’s a branch on the lower right of the photo that sticks out in front of the bird and is quite distracting.

Screen calibration

Before I go any further I want to talk a little about calibrating your monitor screen.  It’s almost pointless to go into a photo editing program and perform all sorts of adjustments on an image if your monitor is displaying your image too brightly, or with too much color saturation, etc.  The image itself may be perfectly fine but your monitor may be configured incorrectly.  If this is the case, then the adjustments you make to your image will likely be incorrect and make the image even worse.  It’s important that you see the image the way it is supposed to look.

Calibration software and devices are available but are not real cheap.  I use an X-rite Eye One calibrator which makes calibration fairly painless.  If you can’t afford something like this, then manually calibrating your screen is better than nothing. Windows 7 has a Display Color Calibration program in the Display section of the Control Panel.  Running through this process every few months will help keep your monitor displaying your images the way they should be displayed.

Lightroom 3’s Process Version

In Lightroom 3, Adobe improved the adjustment controls so much (especially sharpening and noise reduction), that they had to include a “2010 Process Version” and also include the previous “2003 Process Version,” so owner’s of Lightroom versions 1 & 2 could choose to display their images with either version.

I have thousands of RAW images in my catalog that were processed with LR2 or LR1, which both used the initial 2003 process version.  If I select one of those images in LR3, a small exclamation point icon shows up in the bottom right corner of the main image viewing area.  The image below shows the icon circled in red.  Just to the right of this icon it confirms that the image being displayed was processed with the 2003 version.  The image doesn’t look all that great either—lots of noise and needs sharpening.

If I click the exclamation point I get this box.


I can choose to update just this image or all the images in the filmstrip.  I can also choose to view each image before and after the change to the 2010 version.  In this case, since I’m not taking time to re-process these 2009 images right now, I’ll choose to update just this wren photo to the 2010 process version.  I now have all the adjustment sliders in LR3 available to work with on this image.

Lightroom 4 will also have a new process version, 2012, to go along with the 2003 and 2010 versions.

Pick a shot to process

Now, it’s time to choose a shot to work on and get down to the nitty gritty of image processing.  I’m going to start with the vertical image.  I’ve got it selected in LR3 and I’m in Develop mode.  The only panel I have left open is the one on the right where my adjustment controls are.  The other three are hidden and out of the way so the image will display larger.  Here’s the screen print.

I’ll generally adjust the controls from the top down. I usually do my cropping first so I click the rectangle icon on the left of the Tool Strip to open the crop tool.  The screen shot below is showing the grid on the image and by clicking the crop icon, the panel underneath the Tool Strip now has changed to crop-related adjustment tools.  The large image is also framed now with a grid and handles with which to adjust the crop size.  At this point, if I needed to straighten the image, which I don’t, I would click just outside the image border (on the gray) and the cursor would turn to a double-arrow icon bent at 90 degrees.  I then would just drag the mouse a little to get the image turned straight.  LR3 would then automatically crop the crooked edges off and straighten the image.


I decide now to use a 4×5 crop on this image and I do this by selecting the 4×5 aspect ratio from a list of ratios that I use a lot.  If you look back up at the previous screen print, the word “Original” appears across from the Aspect tool.  This is my default, but if I click on the word “Original,” a drop-down menu gives me more choices for size of crop, and I picked 4×5.

You can see in the screen shot below that I have cropped out a lot of stuff around the bird—even the perch, which I wasn’t too excited about anyway.  But I also cropped out that distracting branch in the lower-right corner.  I lost some good stuff like the talons but the branch could have been a problem to deal with—although not impossible to remove.  I just chose the easier road here.


Once I have the crop frame where I want it on the image, I click the crop icon (rectangle) again, and the image is cropped and the crop tool closes.  The next screen shot displays the image cropped and ready to move on to the next adjustments.

Lately, I’ve been having technical difficulties with WordPress, the software I use to run my site theme.  I am going to have to break up this article into two parts to get around this problem.  So I’ll stop here and continue where I left off in the next article, Part 24.  Please be sure to read ahead to the next part (24) for my continuation of how I use Lightroom 3 in post-processing!

<<Previous Article                                                                                     Next Article >>

Bird Photography Equipment (1)

DSLR Features for Bird Photography (2)


Memory Cards for Cameras (3)

Lenses for Bird Photography (4)

Bird Photography Accessories (5)

Tripod or Monopod? (6)

More Accessories for Bird Photography (7)

Software Introduction for Bird Photography (8)

Introduction to Capturing Bird Images (9)

JPG or RAW? (10)

Shooting Bird Photos (11)

Camera Exposure Modes (12)

Other Camera Settings and Features (13)

Exif Data (14)

Depth of Field and Aperture (15)

Best Time to Photograph Birds (16)

Composition in Bird Photography (17)

Getting Close in Bird Photography (18)

Backgrounds in Bird Photography (19)

Using External Flash in Bird Photography (20)

Photographing Birds in Flight, 21

Lightroom 3 – The Hub of My Workflow (22)

Processing Images in Lightroom 3 (24)
From Lightroom to Plugins (25)

Using Lightroom to Upload Images (26)

Leave a Comment

Your email address will not be published. Required fields are marked *

My Gear:

  • Canon EOS 5D Mark IV & Grip
  • Canon EOS 7D Mark II
  • Canon EF 500mm f4L IS II
  • Canon EF 24-105mm f4L
  • Canon EF 50mm f1.8
  • Canon 1.4X III Extender
  • Canon 2x III Extender
  • Canon 580EX Flash
  • Zoom H1 Recorder
  • Better Beamer
  • Manfrotto tripod/monopod
  • Manfrotto Gimbal Head
  • Sandisk Compact Flash Cards
  • The Molar Bean Bag by Vertex
  • Joby Gorillapod Focus & Ballhead
  • Canon EG200 Backpack
  • Storm Jacket Camera Cover
  • Kinesis Safari Sack
  • Original Bug Shirt Elite Edition

Software:

  • Adobe Photoshop CC
  • Adobe Photoshop Lightroom Classic
  • Nik Color EFEX Pro 4
  • Nik Sharpener 3
  • Nik Dfine 2.0
  • Nik Viveza 2
  • Nik HDR Efex Pro 2
  • Nik Silver Efex Pro 2
  • Nik Analog Efex Pro