Getting Close to Birds, Part 18

Home » Getting Close to Birds, Part 18

Getting Close to Birds, Part 18

Posted in

Getting Close to Birds

How close you get to your subject has a direct relationship to the quality and sharpness of your bird images.  The more pixels the bird has in it, the better.  I’m not saying to pass up the shot just because the critter isn’t perched at your lens’s minimum focusing distance!  But generally, quality does increase when the bird comes closer to filling the frame (in close up bird photography).

Try being as quiet as you can as you walk or drive around.  Don’t make sudden noises or movements.  Try standing in one place for at least ten minutes to see if any nearby birds will get used to you being there.  Wear earth colors so you blend in better.  When walking on gravel trails, walk on the edge where some grass is instead of on the noisy gravel.  Listen for the calls and songs of birds.  After a while, you’ll be able to identify certain birds by their call/song.

If you’re out on foot and a bird is too far away, try moving closer by zig-zagging toward the bird instead of walking in a straight line to the bird.

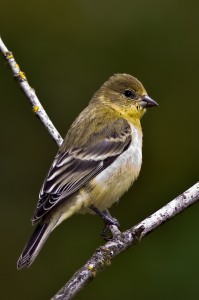
Sometimes it’s just plain dumb luck when a bird will land close to you.  I remember walking a gravel trail at one of my local refuges on my way back to the parking lot, when this Lesser Goldfinch landed in this small, leafless, tree only fifteen feet away from me.  I had my camera on the trusty old monopod over my shoulder, brought it down quietly but quickly, and got this image.  [Click on the image for a large view].

From the time I saw the bird land to the time I shot several frames, only 5 to 7 seconds had passed.

Practice a lot and learn from your experience.  Techniques that work for me may be different from what works for you.


<<Previous Article                                                                                     Next Article >>

Bird Photography Equipment (1)

DSLR Features for Bird Photography (2)

Memory Cards for Cameras (3)

Lenses for Bird Photography (4)

Bird Photography Accessories (5)

Tripod or Monopod? (6)

More Accessories for Bird Photography (7)

Software Introduction for Bird Photography (8)

Introduction to Capturing Bird Images (9)

JPG or RAW? (10)

Shooting Bird Photos (11)

Camera Exposure Modes (12)

Other Camera Settings and Features (13)

Exif Data (14)

Depth of Field and Aperture (15)

Best Time to Photograph Birds (16)

Composition in Bird Photography (17)

Backgrounds in Bird Photography (19)

Using External Flash when Photographing Birds (20)

Photographing Birds in Flight (21)

Lightroom 3: Hub of my Workflow (22)


Processing Images in Lightroom 3 (23)


Processing Images in Lightroom 3 (24)


From Lightroom to Plugins (25)


Using Lightroom to Upload Images (26)


Leave a Comment

Your email address will not be published. Required fields are marked *

My Gear:

  • Canon EOS 5D Mark IV & Grip
  • Canon EOS 7D Mark II
  • Canon EF 500mm f4L IS II
  • Canon EF 24-105mm f4L
  • Canon EF 50mm f1.8
  • Canon 1.4X III Extender
  • Canon 2x III Extender
  • Canon 580EX Flash
  • Zoom H1 Recorder
  • Better Beamer
  • Manfrotto tripod/monopod
  • Manfrotto Gimbal Head
  • Sandisk Compact Flash Cards
  • The Molar Bean Bag by Vertex
  • Joby Gorillapod Focus & Ballhead
  • Canon EG200 Backpack
  • Storm Jacket Camera Cover
  • Kinesis Safari Sack
  • Original Bug Shirt Elite Edition

Software:

  • Adobe Photoshop CC
  • Adobe Photoshop Lightroom Classic
  • Nik Color EFEX Pro 4
  • Nik Sharpener 3
  • Nik Dfine 2.0
  • Nik Viveza 2
  • Nik HDR Efex Pro 2
  • Nik Silver Efex Pro 2
  • Nik Analog Efex Pro