Using Lightroom to Upload Images, Part 26

Home » Using Lightroom to Upload Images, Part 26

Using Lightroom to Upload Images, Part 26

Posted in

This is probably the official last part to my Digital Bird Photography series.  We’ve come a long way since Part 1 and in the previous four parts (22 thru 25) I took you through post-processing some sample images in Lightroom, Photoshop, and Color EFEX Pro 4.  Now that I’ve got some processed images I’ll want to upload them to some websites using Lightroom 4.  I have a handful of websites I typically upload images to including Flickr, CaptureClarkCounty, Facebook (once in a while), Costco, and even my own website, DennisDavenportPhotography.com.

Lightroom 4 (LR4) (and 3) makes it pretty easy and fast to upload images while making sure the attributes of the images are correct for each destination site.  For instance, my personal website requires that I upload images that are a little bigger in physical size than does Flickr.  LR4 allows me to save presets for each destination site so that I don’t have to even think about sizes, resolutions, file format, etc.

In the Library Module, all the way down to the bottom of the left-side panel, there is the Publish Services panel in LR.  Here’s what it looks like on my screen.  [Be sure to click on these images to see them large].

When you initially install LR4, the Facebook and Flickr services are already installed with the program.  I purchased the Costco Photo Service plugin extra and installed it.  Notice on the Costco button, over to the right it says, “Set Up.”  This means I have not yet set up the configuration with my Costco username and password for this catalog.  In fact, I have yet to print a bird/wildlife picture at Costco so I may not need to set this up in this catalog.  I bought the Costco plugin to upload family event photos to Costco, so when I load that catalog, the Costco plugin no longer says, “Set Up,” on the button.

The same goes for the Facebook publish service for this particular catalog.  I don’t usually upload wildlife images to Facebook so it’s not set up either.

But the Flickr publish service I use a lot.  It has been configured and shows my Flickr username right on the button.  The entry (album) just under the Flickr button is called Photostream, which is my Flickr portfolio of photos.  Each time I upload an image, it gets added to my Photostream.  The Photostream entry indicates I have 149 images either uploaded or ready to upload.  Underneath that is an album named Test.  I created this when I first was testing the Flickr publish service and just haven’t gotten around to deleting it yet. 🙂

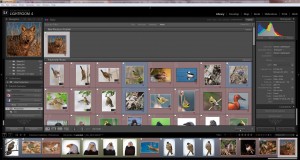
Refer to the above screen shot.  The main thumbnail area has two sections–“New Photos to Publish” and “Published Photos.”  Both are self-explanatory as to what each contains.  To get an image into the New Photos to Publish section, in the Library Module, I first selected the folder in Lightroom that contained the coyote picture and scrolled until I was viewing the coyote thumbnail in Grid view.  I clicked the coyote thumbnail to select it.   Then I scrolled the left panel down to the Publish Services panel so that the Flickr Photostream album was displayed.  Then, I drag the coyote thumbnail (or group of thumbnails) over to the Photostream album.  The coyote thumbnail then appears as shown above in the screen shot.

My next step is to upload the coyote image so that it drops down to the “Published Photos” area on the Lightroom screen.  But before I do that, I need to make sure that all my image parameters are set up in the Export dialog box.  Obviously, my Export box has already been configured but I’ll show you how I did mine as an example, and how it can be saved as a preset for future use.  It takes some work to set up a preset but once it is saved it’s so easy to just click on it to use it.

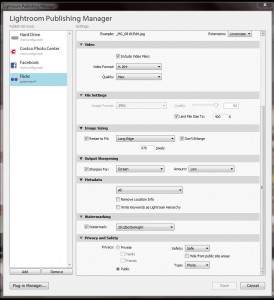
Before I do any publishing, I right-click on the Flickr button in LR4 (not the Photostream button).  I then choose Edit Settings.  The Lightroom Publishing Manager pops up and looks like this.

I have this box scrolled down to the more interesting settings.

File Settings

Image Format: jpg

Quality: 92 (this may be higher than I need but I didn’t want to skimp on quality)

Limit File Size To:  400k (this should be plenty big for a 4×6 at 72ppi)


Image Sizing

Resize to Fit:  Long Edge

Pixels:  970 (I want the files to be small to curb thievery)


Output Sharpening

Sharpen For:  Screen (I can also choose from Matte paper and Glossy paper)

Amount:  Low (Other choices are Standard and High)


Metadata

Choices are Copyright Only, Copyright and Contact Info only, All Except Camera & Camera Raw Info, and All

I usually set this to All


Watermarking

Watermarked:  checked

In the drop down menu, it displays a bunch of different presets that I have saved.  For each year, I save a watermark positioned in each corner of an image.  So, I normally have 4 presets for each year.  The watermark setting displayed in the screen shot above is “2012 Bottomright.”  I also have saved, Topright, Topleft, and Bottomleft.  This is a setting that could be different from image to image so I make sure it is set to the proper location for the watermark.


Privacy and Safety

Here I’ll switch between private and public depending on the photo and the reason I’m uploading it.


Publishing Images in Lightroom

If I change any of the above publish settings from their current settings, the Save button activates.  When I click Save, LR4 asks whether I want to apply these new settings to images already uploaded or to leave them as is.  I normally choose to leave them as is.  So I’ve now chosen Save and the Publishing Manager has closed.

Notice the Publish button just underneath the Publish Services panel.  Since I have only one image to upload I can simply click the Publish button and LR4 will connect with my Flickr account and upload the image with the parameters I have set and saved.  Say I had six images waiting in the New Photos to Publish section, and I wanted to only publish three of them right now for whatever reason.  I can hold down the ALT key and the Publish Button will change to a Publish Selected button.  If I have the three image thumbnails selected (out of the six), just those three will be uploaded when I click the Publish Selected button.

Now I have 149 published images on my Flickr photostream.  By publishing these photos out of LR4, the program not only uploads them to my desired destination but it also keeps track of them.  If at anytime in the future I edit one of these photos, LR4 will detect it and ask if I want to re-publish the image.  This helps to keep the uploaded images updated to their latest versions.

Facebook and Costco publishers work very similar to the Flickr one.  I have now set up my configuration for the Costco publisher with my wildlife catalog.  But I can use the Costco publisher also as an Exporter.  A primary difference between publishing and exporting is that LR4 does not keep track of, or manage, exported images.  Once the image is exported, LR4 forgets about the uploaded image and has no ties to it, although it still exists in the LR4 catalog.

So, if I don’t care that LR4 won’t be managing my uploads to Costco, I can instead choose to right-click on the image and choose Export>Export.  This brings up the Export dialog box.  Here I can set basically the same parameters that I set in the Flickr Publishing Manager.  There’s a drop down menu at the very top of the box called “Export To.”  I choose Costco Photo Center from this list, and set all the parameters such as file naming, image format and quality, color space, size, sharpening, metadata, and watermarking.  I can save these settings so that I’ll never have to set them again for this type of image.  I then hit the Export button and away the image goes to Costco.  This keeps me from having to navigate some of the murky waters of the Costco Photo website.  Of course, I still need to go in to the Costco site to order the prints.


More on Exporting Images

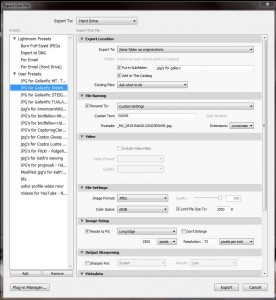
Speaking of Exporting images—Below is my Export dialog box for Costco as described above.  But you’ll notice on the left panel there is a list of Presets that I have created called User Presets.  There is also a list of Lightroom Presets that came with the program.  Note now that the Export To pull down menu is now set to Hard Drive.  These presets export images to a custom-named folder that I have designated and is located in, “The Same Folder as the Original Folder,” which I have selected in the Export Location area of the settings.  Now I never have to worry about forgetting where my images are being saved because they are consistently filed with this tool.

I decided to make presets for each of the my most visited locations where I shoot wildlife.  Each one produces a custom file name for the image that included an abbreviation of the location.  Some of my presets are made to keep track of which images I have uploaded to certain wildlife sites such as Project Noah, American Wildbird, and Birdfellow, etc.  The presets file them in a folder that is within the folder where the original RAW files are located, but named with the specific website that it was intended to be sent to.  This way there is no confusion for me later as to why these versions of my images exist on my hard drive.  They are also easy to navigate to, from within the websites’ upload dialog boxes.  Presets are such a time saver in Lightroom no matter what part of the program I am working in.

Printing at Costco

One word about color space for Costco prints.  There is a website, drycreekphoto.com, that has available for download the ICC Color Profiles for most of the Costco Photo Centers, and other photo printing outlets.  There are different profiles for glossy paper and for lustre paper for specific Costco printers.  I downloaded these profiles and installed them (they have instructions on the site).  I embed the profile in the image by using Photoshop.  I use the Edit>Convert to Profile command in Photoshop when the image is open.  I change the Destination Space to the desired profile then save and upload the image to Costco.  I also include in the image’s file name that this version of the image has a Costco printer profile (for my own use).  When I am ordering my prints at Costco online and I get to the options section, and make sure to disable the Use Auto Correct option.  This tells Costco to print the image on a specific printer that matches the color profile that I embedded in the image.  It also tells them not to adjust any colors, i.e., they print them just as I sent them in.  I occasionally check Dry Creek Photo for updates to these profiles.  You never know when Costco might get a new printer or update their printer’s firmware.

If you haven’t used the publishing/exporting features of Lightroom, I hope you picked up a few tips and trips about it here.  This concludes my 26 part series on Digital Bird Photography.  It’s been quite a project for me.  Thanks for reading!


<<Previous Article                                                                                  

Bird Photography Equipment (1)

DSLR Features for Bird Photography (2)

Memory Cards for Cameras (3)

Lenses for Bird Photography (4)

Bird Photography Accessories (5)

Tripod or Monopod? (6)

More Accessories for Bird Photography (7)

Software Introduction for Bird Photography (8)

Introduction to Capturing Bird Images (9)

JPG or RAW? (10)

Shooting Bird Photos (11)

Camera Exposure Modes (12)

Other Camera Settings and Features (13)

Exif Data (14)

Depth of Field and Aperture (15)

Best Time to Photograph Birds (16)

Composition in Bird Photography (17)

Getting Close in Bird Photography (18)

Backgrounds in Bird Photography (19)

Using External Flash in Bird Photography (20)

Photographing Birds in Flight, 21

Lightroom 3 – The Hub of My Workflow (22)

Processing Images in Lightroom 3 (23)

Processing Images in Lightroom 3 (24)

From Lightroom to Plugins (25)
 

Leave a Comment

Your email address will not be published. Required fields are marked *

My Gear:

  • Canon EOS 5D Mark IV & Grip
  • Canon EOS 7D Mark II
  • Canon EF 500mm f4L IS II
  • Canon EF 24-105mm f4L
  • Canon EF 50mm f1.8
  • Canon 1.4X III Extender
  • Canon 2x III Extender
  • Canon 580EX Flash
  • Zoom H1 Recorder
  • Better Beamer
  • Manfrotto tripod/monopod
  • Manfrotto Gimbal Head
  • Sandisk Compact Flash Cards
  • The Molar Bean Bag by Vertex
  • Joby Gorillapod Focus & Ballhead
  • Canon EG200 Backpack
  • Storm Jacket Camera Cover
  • Kinesis Safari Sack
  • Original Bug Shirt Elite Edition

Software:

  • Adobe Photoshop CC
  • Adobe Photoshop Lightroom Classic
  • Nik Color EFEX Pro 4
  • Nik Sharpener 3
  • Nik Dfine 2.0
  • Nik Viveza 2
  • Nik HDR Efex Pro 2
  • Nik Silver Efex Pro 2
  • Nik Analog Efex Pro